Halloween cookies
Oh, I so love Halloween! Joe and I had a blast this weekend scarifying the house, decorating cookies (OK, that was just me), hanging out at the neighborhood block party, and making ourselves zombies for the big night. There was also a night at the opera and crazy-costume-wearing-people-watching with friends at a dueling piano bar. Seriously fun weekend.
I think I'm getting better at this cookie-baking and cookie-decorating thing (they're looking less like finger-paintings and more like cubism... baby steps...) but boy is that ever a time-consumer. Baking sugar cookies and chocolate cookies, then cutting them into cute Halloween shapes was pretty speedy. 4 colors of royal icing piping and flooding was more intimidating, but I had a blast designing and executing the cookies, particularly the zombies. Zombie cookies!

In Spain, we stumbled across a product line by a Spanish company named Lekue. We bought out the store. This weekend was my first trial of the Lekue decorating supplies and they were fantastic for flooding the cookies but not so great for piping. The mouth of the decorating tool (not a bottle, not a bag... a pouch, maybe?) is so wonderfully wide, which means that pouring the royal icing into the pouch is a breeze.

What else did I learn from this most recent venture... Mummy bandages (not unlike basketweaves) require much, much thicker royal icing, but they still look pretty cool with the regular icing... When out of red decorating gel, make your own by mixing 1 packet of gelatin and 1 Tbsp of water over low heat (don't boil), then add 1 cup of corn syrup and your food coloring. It's not real blood, but it's the next best thing for your zombie cookies... Waiting about 24 hours to use your royal icing makes the final dried product a bit more crumbly-looking... Cookies take a very, very long time to dry... Fortunately, they taste just as good when they're slightly damaged...

I'm including my preferred cookie recipes (so far), from an extremely practical little book called Cookie Craft, which I strongly recommend for anyone deciding to venture into the absorbing world of cookie decorating. Rolling the cookie dough between a sheet of parchment paper and a sheet of waxed paper, with 1/4-inch cookie slats as guides, makes rolling and cutting the shapes stress-free. If this was the only tip I had gleaned from Cookie Craft, I would consider it money well-spent (since the book was actually a gift from the sis-in-law, it's like money in the bank), but there's so much more.

Yield: 2 1/2 inch cookies - about 30
3 1/2 inch cookies - about 16
4 1/2 inch cookies - about 12
3 cups all-purpose flour
1/2 tsp salt
1 cup (2 sticks) unsalted butter, softened
1 cup sugar
1 large egg
2 tsp vanilla or 1 tsp vanilla plus zest of 1 lemon (I use vanilla only)*
food coloring (say, green and a bit of black gels if you're going for zombie skin)
*can also use almond or peppermint or other extracts, but make sure the icing flavors are complementary
Whisk together the flour and salt in a medium bowl and set aside.
Using your mixer, cream together the butter and sugar until the mixture is light and fluffy. If your mixer has multiple attachments, use the paddle. Add the egg and vanilla (and lemon zest, if you're using it) or your extract of choice and mix until well blended.
With the mixer on low, gradually add the flour mixture to the butter mixture until the two are thoroughly blended.
If your cookie design calls for adding food coloring, do so now, and continue blending until the desired color is reached and is evenly incorporated.
Turn out the dough onto the work surface and divide it into two or three equal portions. Form each one into a rough disk. Roll between 2 sheets of parchment paper (or base of parchment and top of waxed paper, that you can then use again), using 2 1/4-inch cookie slats as thickness guides. Chill until firm (1-2 hours) then cut out the cookie shapes. Re-roll remaining dough and repeat.
Preheat the oven to 350F
After you've rolled and cut the dough and the cookie shapes are on parchment-lined cookie sheets, bake them in the middle rack of your oven 12-16 minutes or until the cookies start to turn slightly golden around the edges (smaller cookies will be done more quickly).
Cool the cookies completely on a rack before icing or decorating.

Use the same recipe as above, with the following modifications:
Replace 1/2 cup of flour with 1/2 cup of cocoa powder
Add 1 tsp instant espresso powder (optional but recommended)
Use 1 tsp of vanilla (instead of 2)
This dough will be pretty dark, so coloring shouldn't be needed (unless you want to make them almost black with some black gel coloring).

2 cups powdered sugar
3 Tbsp liquid pasteurized egg whites
1 Tbsp warm water
1 Tbsp lemon juice OR 1 Tsp extract
Food coloring
Combine all ingredients and beat on high for 5 minutes in a stand mixer (10 minutes if by hand). If you have multiple attachments, use the paddle.
Divide the icing into multiple airtight containers and color each container.


I used lemon juice as flavoring this time around, only because I knew I was going to use a lot of white and the vanilla discolors the white icing. I don't like the taste of the icing on the spoon as much, but when it was on the cookies it was yummy. I think next time I'll make 2 batches, one with lemon juice for light colors and another with vanilla.
I think the best way to make flood is to take some of the colored royal icing and gradually add small amounts of water until your flood is at the desired consistency. Then the colors of piping and flood match perfectly.
This is hardly a primer for a beginner cookie decorator, but the rest is all in the book...

Now, a few more cookie pics.


 |
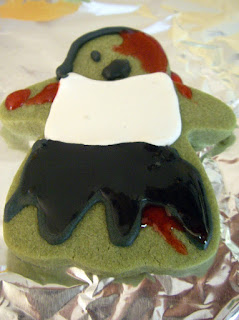
| this was later in the evening, when zombie parts were beginning to fall to the ground, but I think you get the general idea. |
I think I'm getting better at this cookie-baking and cookie-decorating thing (they're looking less like finger-paintings and more like cubism... baby steps...) but boy is that ever a time-consumer. Baking sugar cookies and chocolate cookies, then cutting them into cute Halloween shapes was pretty speedy. 4 colors of royal icing piping and flooding was more intimidating, but I had a blast designing and executing the cookies, particularly the zombies. Zombie cookies!

In Spain, we stumbled across a product line by a Spanish company named Lekue. We bought out the store. This weekend was my first trial of the Lekue decorating supplies and they were fantastic for flooding the cookies but not so great for piping. The mouth of the decorating tool (not a bottle, not a bag... a pouch, maybe?) is so wonderfully wide, which means that pouring the royal icing into the pouch is a breeze.

What else did I learn from this most recent venture... Mummy bandages (not unlike basketweaves) require much, much thicker royal icing, but they still look pretty cool with the regular icing... When out of red decorating gel, make your own by mixing 1 packet of gelatin and 1 Tbsp of water over low heat (don't boil), then add 1 cup of corn syrup and your food coloring. It's not real blood, but it's the next best thing for your zombie cookies... Waiting about 24 hours to use your royal icing makes the final dried product a bit more crumbly-looking... Cookies take a very, very long time to dry... Fortunately, they taste just as good when they're slightly damaged...

I'm including my preferred cookie recipes (so far), from an extremely practical little book called Cookie Craft, which I strongly recommend for anyone deciding to venture into the absorbing world of cookie decorating. Rolling the cookie dough between a sheet of parchment paper and a sheet of waxed paper, with 1/4-inch cookie slats as guides, makes rolling and cutting the shapes stress-free. If this was the only tip I had gleaned from Cookie Craft, I would consider it money well-spent (since the book was actually a gift from the sis-in-law, it's like money in the bank), but there's so much more.

Rolled sugar cookies
Yield: 2 1/2 inch cookies - about 30
3 1/2 inch cookies - about 16
4 1/2 inch cookies - about 12
3 cups all-purpose flour
1/2 tsp salt
1 cup (2 sticks) unsalted butter, softened
1 cup sugar
1 large egg
2 tsp vanilla or 1 tsp vanilla plus zest of 1 lemon (I use vanilla only)*
food coloring (say, green and a bit of black gels if you're going for zombie skin)
*can also use almond or peppermint or other extracts, but make sure the icing flavors are complementary
Whisk together the flour and salt in a medium bowl and set aside.
Using your mixer, cream together the butter and sugar until the mixture is light and fluffy. If your mixer has multiple attachments, use the paddle. Add the egg and vanilla (and lemon zest, if you're using it) or your extract of choice and mix until well blended.
With the mixer on low, gradually add the flour mixture to the butter mixture until the two are thoroughly blended.
If your cookie design calls for adding food coloring, do so now, and continue blending until the desired color is reached and is evenly incorporated.
Turn out the dough onto the work surface and divide it into two or three equal portions. Form each one into a rough disk. Roll between 2 sheets of parchment paper (or base of parchment and top of waxed paper, that you can then use again), using 2 1/4-inch cookie slats as thickness guides. Chill until firm (1-2 hours) then cut out the cookie shapes. Re-roll remaining dough and repeat.
Preheat the oven to 350F
After you've rolled and cut the dough and the cookie shapes are on parchment-lined cookie sheets, bake them in the middle rack of your oven 12-16 minutes or until the cookies start to turn slightly golden around the edges (smaller cookies will be done more quickly).
Cool the cookies completely on a rack before icing or decorating.

Rolled chocolate cookies
Use the same recipe as above, with the following modifications:
Replace 1/2 cup of flour with 1/2 cup of cocoa powder
Add 1 tsp instant espresso powder (optional but recommended)
Use 1 tsp of vanilla (instead of 2)
This dough will be pretty dark, so coloring shouldn't be needed (unless you want to make them almost black with some black gel coloring).

Royal icing
(should make enough for 1 batch of cookies)
2 cups powdered sugar
3 Tbsp liquid pasteurized egg whites
1 Tbsp warm water
1 Tbsp lemon juice OR 1 Tsp extract
Food coloring
Combine all ingredients and beat on high for 5 minutes in a stand mixer (10 minutes if by hand). If you have multiple attachments, use the paddle.
Divide the icing into multiple airtight containers and color each container.


I used lemon juice as flavoring this time around, only because I knew I was going to use a lot of white and the vanilla discolors the white icing. I don't like the taste of the icing on the spoon as much, but when it was on the cookies it was yummy. I think next time I'll make 2 batches, one with lemon juice for light colors and another with vanilla.
I think the best way to make flood is to take some of the colored royal icing and gradually add small amounts of water until your flood is at the desired consistency. Then the colors of piping and flood match perfectly.
This is hardly a primer for a beginner cookie decorator, but the rest is all in the book...

Now, a few more cookie pics.


Comments
Post a Comment